

Tables
Online Table
The Online Table is designed for real-time monitoring of live system variables. Unlike Basic or Editable Tables, it does not connect to a SQL database. Instead, it streams values directly from a running CODESYS controller.
This makes the Online Table ideal for scenarios where up-to-date process values, status feedback, or live sensor readings must be continuously observed in the visualization layer.
Supported data types include:
- BOOL, INT, DINT, REAL, STRING (from CODESYS variables)
- Arrays and structured fields (e.g. tables of sensor states)
Important:
As Default the Online Table is read-only – users cannot write or change values here. It is purely for display purposes.
Like all table types, it adheres to the permission model (Read, Insert, Update, Delete) — but in this case, only Read is functionally relevant.
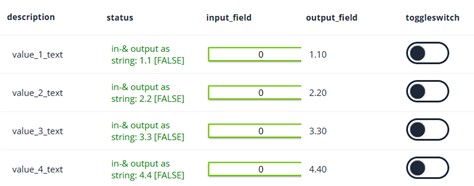
⚠️ It is possible to use the Onlinetable mixed. That mean with input- and outputfields, toggle switches and row selection..
Needed steps in CoDeSys
Some steps for using PlcVisu are obligatory and marked with [*]
You need this in any cases.
[1] Register Websocketserver *
PROGRAM PLC_PRG VAR, wsInst : PLcVisu.wsInitFB; // WS instance for the communication init, END_VAR
[2] copy library to the project *
Source: https://doc.plcvisu.cloud/en/downloads.html
[3] create a new directory and program for better overview.
add new folder. For example: 07_OnlineTable
add a new program. For example: onlineTablePrg
call the program from a new 500ms Task (faster is not necessary)
[4] Create the following 4 structures
The following structures are based on a table with the following parameters:
number of rows = MAXROW
Number of columns = 5
Kind of columns
No.1 - Text
No.2 - Text
No.3 – input field
No.4 – output field
No.5 - toggleswitch
Structure #1 = OnlineTable
TYPE OnlineTable : STRUCT structure : OnlineTableStructure; data : OnlineTableData; meta : PLCVisu.OnlineTableMeta; END_STRUCT END_TYPE
Structure #2 = OnlineTableDate
- Define the numbers of rows
TYPE OnlineTableData :
  STRUCT
    rows    : ARRAY [0..onlineTablePrg.MAXROW] OF OnlineTableRow;  // No of rows. With select-, toggle- or input- funktion, please start with Index = 0
  END_STRUCT
END_TYPE
Structure #3 = OnlineTableRow
-
define the number and kind of column in a row
TYPE OnlineTableRow :
  STRUCT
    Device       : PlcVisu.OnlineTableText;     // Column#1 is TEXT
    status       : PlcVisu.OnlineTableText;     // Column#2 is TEXT
    input_field  : PlcVisu.OnlineTableInput;    // Column#3 is input field type  REAL
    output_field : PlcVisu.OnlineTableNumber;   // Column#4 is output field type REAL
    toggleswitch : PlcVisu.OnlineTableToggle;   // Column#5 is toggleswitch type BOOL
    meta         : PlcVisu.OnlineTableRowMeta;  // Meta is always needed
  END_STRUCT
END_TYPE
Structure #4 = OnlineTableStructures
-
define the number of column in a row
TYPE OnlineTableStructure :
  STRUCT
    Columns  : ARRAY[1..5] OF PlcVisu.OnlineTableColumn;
  END_STRUCT
END_TYPE
[5] Create label
-
There are some points you have to do once. Example..
 IF xInit = FALSE
 THEN
   onlineTable.structure.columns[1].UIType := 'text';
   onlineTable.structure.columns[1].name   := 'device';
   onlineTable.structure.columns[1].title  := '{{description';        // placeholder-text for column 1
   onlineTable.structure.columns[2].UIType := 'text';
   onlineTable.structure.columns[2].name   := 'status';
   onlineTable.structure.columns[2].title  := '{{status';            // placeholder-text for column 2
   onlineTable.structure.columns[3].UIType := 'input';
   onlineTable.structure.columns[3].name   := 'input_field';
   onlineTable.structure.columns[3].title  := '{{input_field';       // placeholder-text for column 3
   onlineTable.structure.columns[4].UIType := 'number';
   onlineTable.structure.columns[4].name   := 'output_field';
   onlineTable.structure.columns[4].title  := '{{output_field';       // placeholder-text for column 4
   onlineTable.structure.columns[5].UIType := 'toggle';
   onlineTable.structure.columns[5].name   := 'toggleswitch';
   onlineTable.structure.columns[5].title  := '{{toggleswitch';       // placeholder-text for column 5
   // Colum#1
   FOR Loop := 0 TO MAXROW BY 1
   DO
     tmpStr := '{{value_';                  // This Placeholder will use PlcVisu for multilingual textoutput
     tmpStr := ConCat(tmpStr,INT_TO_STRING(Loop));
     tmpStr := ConCat(tmpStr,'_text}}');
     onlineTable.data.rows[Loop].device.value := tmpStr;
     onlineTable.data.rows[Loop].output_field.meta.numberFormat:= '0.00'; // Format the values will display
   END_FOR;
   // Colum#4 - Fill Array to display at colum#4 with default-values to shown at the table
   FOR Loop := 0 TO MAXROW BY 1
   DO
     rArray_Output[Loop]:= Loop + (Loop*0.1);
   END_FOR
   ButtonEnableAll := TRUE; // Show all rows at startup
   xInit           := TRUE; // Init is done
 end_if
[6] Create cyclic part
-
Input field: Table to variable
// -------------------------------------------------------- // Column#3 Input_field // -------------------------------------------------------- FOR Loop := 1 TO MAXROW BY 1 DO rArray_Input[Loop]:= onlineTable.data.rows[Loop].input_field.value; END_FOR -
Output field: Variable to table
// -------------------------------------------------------- // Column#4 Output_field // -------------------------------------------------------- FOR Loop := 1 TO MAXROW BY 1 DO onlineTable.data.rows[Loop].output_field.value := rArray_Output[Loop]; END_FOR -
ToggleSwitch: normally in both directions
// -------------------------------------------------------- // Column#5 Toggleswitch // -------------------------------------------------------- FOR Loop := 1 TO MAXROW BY 1 DO xToggleArray[Loop]:= onlineTable.data.rows[Loop].toggleswitch.value; END_FOR -
Row selection from the Variable onlineTable.meta.selectedIndex you get the number of row witch was selected.
If no row was selected before you get -1
Mark text of complete selected row with own color
You can change the output color of the complete row by changing the value of this variable
onlineTable.data.rows[onlineTable.meta.selectedIndex].meta.extraclass
Using this you must work with the CSS functionality of PLC-Visu.
Example for row selection
// --------------------------------------------------------
// a new row was selected
// --------------------------------------------------------
IF ( onlineTable.meta.selectedIndex <> SelectedIndexOld ) AND // selectedIndex has changed
   ( onlineTable.meta.selectedIndex >= 0                )     // Cause the selectedIndex starts with -1
THEN
  FOR Loop := 0 TO MAXROW BY 1
  DO
    onlineTable.data.rows[Loop].meta.extraclass   := '';
  END_FOR
  onlineTable.data.rows[onlineTable.meta.selectedIndex].meta.extraclass   := 'mygreen'; // Set over CSS
  ButtonEnableAll := FALSE;
END_IF
SelectedIndexOld := onlineTable.meta.selectedIndex; -
Mark individual row and column with color.
onlineTable.data.rows[selected_row].status.meta.color := 'red'; // The name of column #2 is âstatusâ -
Show/hide row:
To hide rows from displaying you can mark these as visible/unvisible
onlineTable.data.rows[selected_row].meta.visible := TRUE; // Row will be visibleor
onlineTable.data.rows[selected_row].meta.visible := FALSE; // Row will be unvisible [7] Create Symbolconfiguration *
The Symbolconfiguration is needed to communicate between CoDeSys ans PlcVisu.
enable the Checkbox for the structure onlineTablePrg/onlineTable
Click “create”.
Steps in PlcVisu
connection
[1] create a Connection
Burger Menu Dashboard Connection new
Connection name = “PLC_connection”
IP-Address = “eth” (This mean PlcVisu and CoDeSys run on the same device)
Connection type = PLC
Port = 80 |443
protocol = PLC_communication
Reconnect = On
Refresh Rate [ms] = 1000
CODESYS username = Administrator
CODESYS password = Administrator
If it’s done well, the Status Led turn to green.
Create a Table.
[1] Create Tables
Press Burger Menu, choose Tables
Tables, select ”new”
Name : online_table
Title : {{my_online_table}}
Type : Remote
[2] Create page with this table
Press burger menu choose “Pages”
Select “New”
Title : page_online_table
Width : 1920
Height: 980
[3] Add the table to the page.
go into the page “page_online_table”
add Tables Table
zoom the element to your preferred size.
Enter not the Tabel and Choose the following parameters
Control properties
- Table
- Connection
- Connection String = 1::Application.onlineTablePrg.onlineTable
(do this by Pressing [+] and selecting the Variable from the list)
- Connection String = 1::Application.onlineTablePrg.onlineTable
- Table Properties
- Select Tables = {{my_online_table}}
- Connection
CSS Editor
To show a complete row in green color you’ll need extraclass and the following Entry in CSS editor.
.mygreen {
           color: green;
         }
Key Features
- Live connection to CODESYS – no intermediate database layer
- Real-time data streaming – shows current system states without delay
- Read-only by design – used solely for monitoring
- Supports arrays and structures – ideal for lists of channels, devices, I/Os
- Visual formatting options – conditional colors, value icons, alignment
- Cyclic or event-based update – based on polling or subscription
- Unified permission model –
Readaccess is respected per user or role